Is Enabling the SSL Connection to Your Java System Enough?

Last Updated: 1/5/2026
Enabling SSL (Secure Sockets Layer) / TLS on your SAP Java system is the baseline requirement for encrypting communication between the server and the web browser. By default, SAP Java systems transmit data via unencrypted HTTP, leaving credentials and business data exposed to Man-in-the-Middle (MitM) attacks.
However, simply enabling the SSL port (typically 50001) is not enough. To fully secure the system, you must also force-redirect all traffic from HTTP to HTTPS using the icm/HTTP/redirect parameter. This guide walks you through generating certificates in the NetWeaver Administrator (NWA) and configuring the ICM parameters, because proper encryption is much more than just a compliance requirement.
What is SSL/TLS?
Secure Sockets Layer (SSL)/Transport Layer Security (TLS) is a protocol used to encrypt communications between two entities (in this case, a Java system and a web browser) by exchanging public and private keys to create secure sessions between them. By default, SSL/TLS is not enabled in SAP Java system, so it’s very important to configure it to enable encryption to help keep your system safe.
Below you will find a step-by-step guide on how to configure this protocol in a Java system.
Configuring SSL/TLS in Java systems
- Log in to the server using SSH and set the following parameters in the instance profile:
- icm/server_port_xx = PROT=HTTPS, PORT=5<instance_number>01, SSLCONFIG=ssl_config_1
- icm/ssl_config_1 = VCLIENT=0, CRED=/usr/sap/<SID>/<Instance_number>/sec/SAPSSLS.pse. Check if the location of the file SAPSSLS.pse is valid. If it is not, change the path where the file is present.

- Log in to the SAP NetWaver Administration page with an administrator user: http://<host>:<port>/nwa
- Navigate to the following path: ‘Configuration → Certificates and Keys‘
- From the list of Key Storage views, select the ICM_SSL_<instance_id>. Once the view is selected, key Storage details will appear.
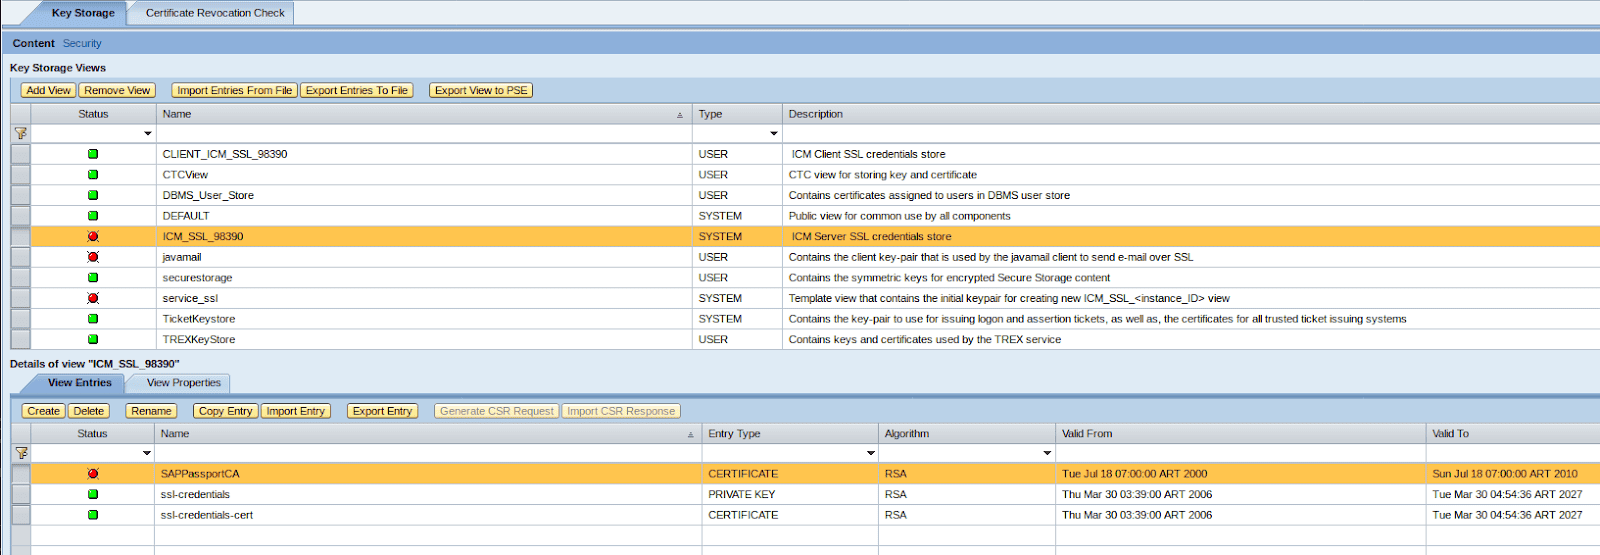
By default, these keystore views contain a key pair that is created during installation for using SSL on the AS Java. This key pair is signed by a testing Certificate Authority (CA).
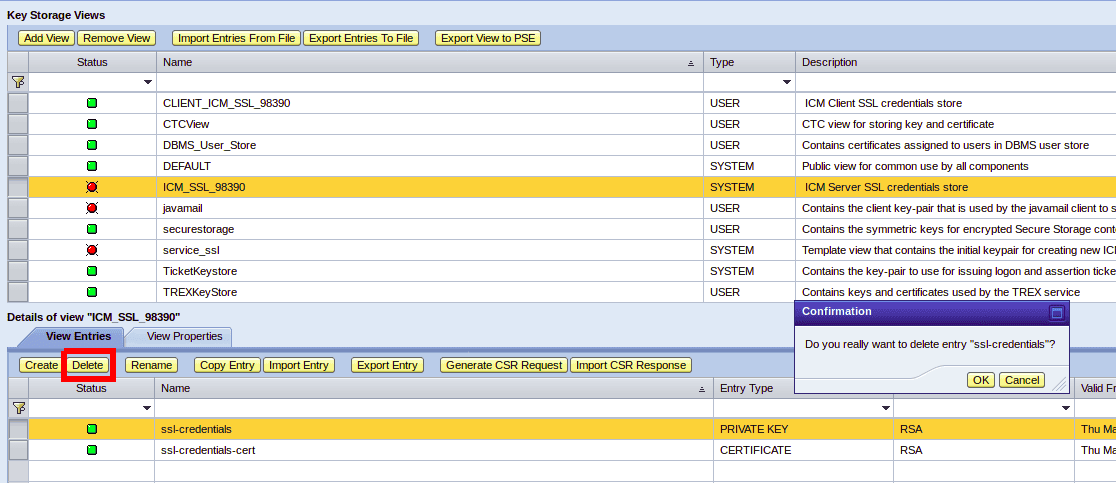
- Choose each entry defined in the ‘View Entries’ tab and click on the ‘Delete’ button. Confirm each operation.
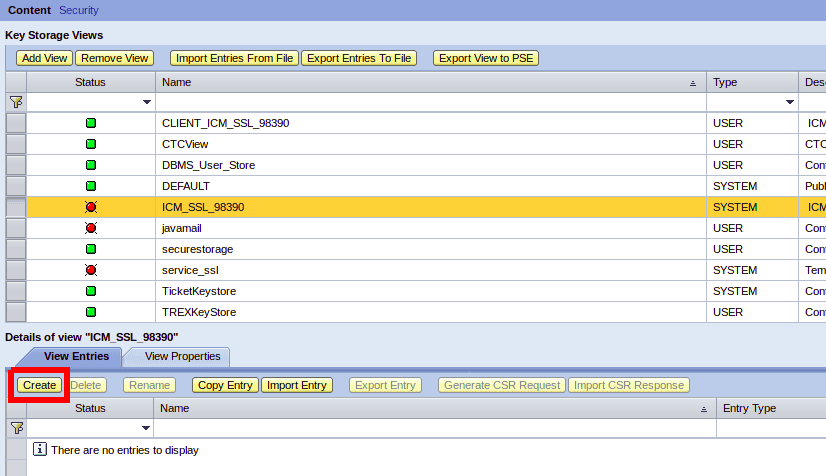
- Once all entries are deleted, click on the ‘Create’ button to add a new entry:
- In the new window complete the following fields:
- Entry Name
- Algorithm
- Key Length
- Valid From
- Valid To
- Store Certificate
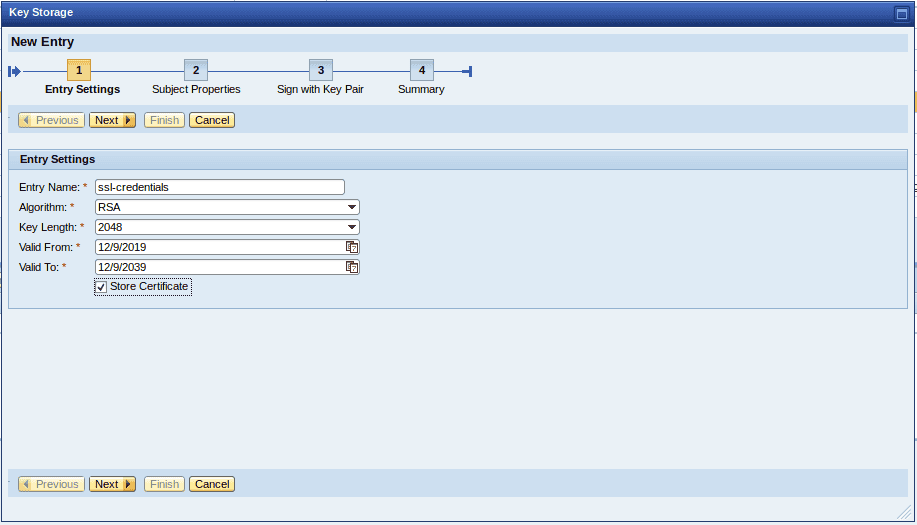
Click ‘Next’ button when all fields are completed.
- On the next page, fill the required fields:
- countryName
- stateOrProvinceName
- organizationName
- localityName
- organizationalUnitName
- commonName
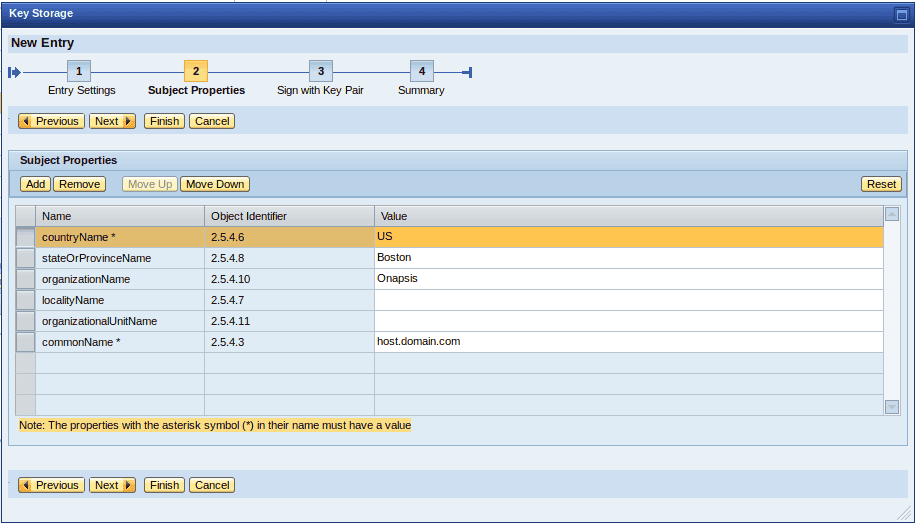
Once the fields are filled, click on ‘Next’ button.
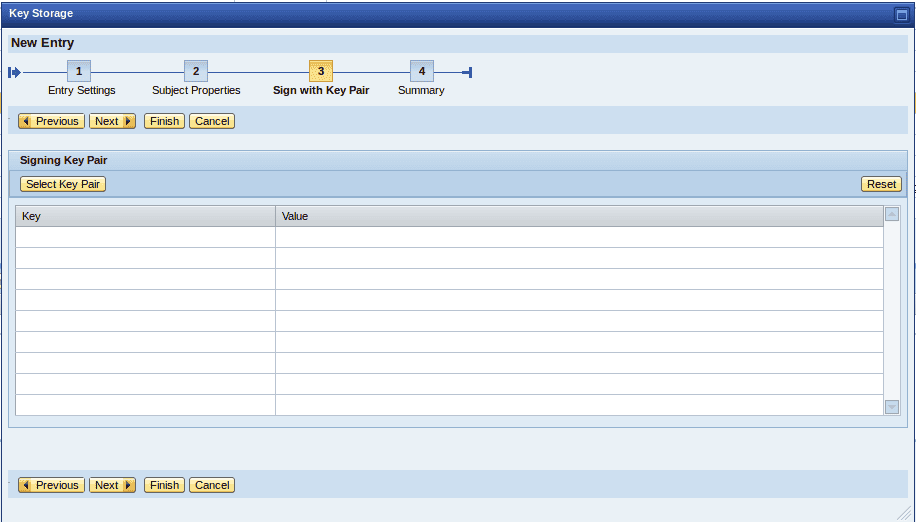
- On the next page, click ‘Next’ again:
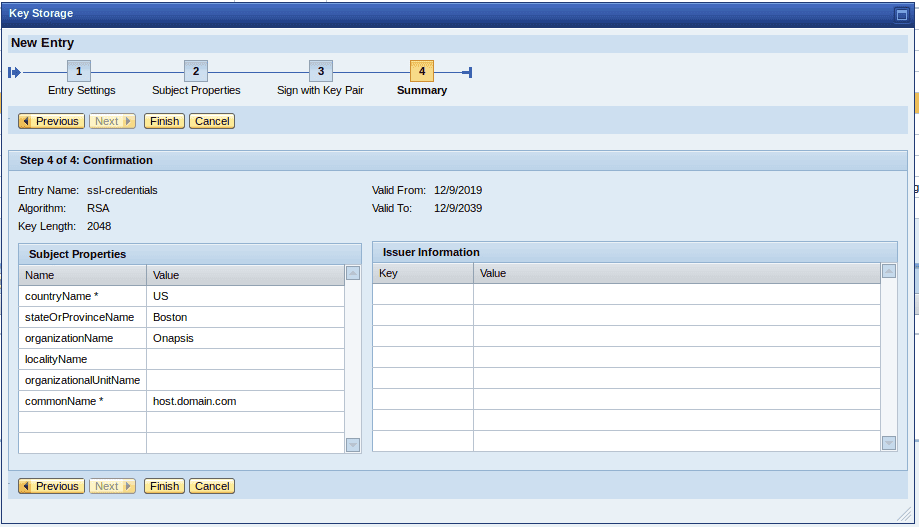
- Check the summary information and if all is correct, click on the ‘Finish’ button. Otherwise, click on ‘Previous’ to change any data:
-
After you click on the ‘Finish’ button, you will return to the first page. Two new entries will appear:

Choose ‘ssl-crendentials’ entry or the name you have chosen and click on the ‘Generate CSR Request’ button. It will appear a pop-up, select ‘Base64 PKCS#10’ and click on the ‘Download’ button:

Save the file.
- Open the file with any text editor. The certificate must be signed by a certified CA. The signature of the certificate is not documented here because the steps depend on which CA you choose.
-
Once the certificate is signed by the CA, you must save the new signed certificate, select the entry ‘ssl-credentials’ and choose the option ‘Import CSR Response’:

- Browse each generated CRT file, click on the ‘Add’ button. As you can see, each certificate will be added in the list:
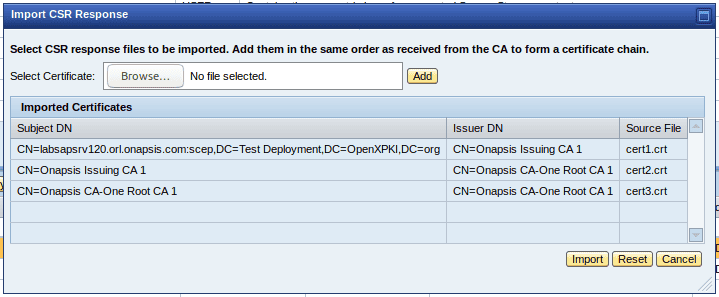
- Once the previous step is completed, you must restart the J2EE engine. Log in to the server using SSH and run the following command with <SID>adm user:

- When the system is completely up, connect to the following URL: http://<host>:<ssl_port>/nwa
Is enabling SSL enough?
No, this is not enough. SSL is now enabled but the port without SSL is still available. So, if we do not take any action, an unencrypted communication between the browser and the Java system is possible and could be used. An attacker could take advantage of this vulnerability in the system with a Man-In-The-Middle attack.
There are a lot of ways to block the access through the port without SSL, but we recommend setting the parameter ‘icm/HTTP/redirect_x’. This parameter can be used to redirect an HTTP request to another destination. For this case, we will use it to redirect the HTTP requests to HTTPS protocol. To configure the parameter, you should perform the following steps:
- Log in to the server using SSH with <SID>adm user
- Go to the following path: /usr/sap/<SID>/SYS/profile
- Add the parameter ‘icm/HTTP/redirect_<x>’ in the instance profile where SSL was configured. <x> must be specified from 0 in ascending order
- Set this value to redirect all http requests to https protocol
icm/HTTP/redirect_<x> = PREFIX=/, FROM=*, FROMPROT=http, PROT=https, HOST=sap_host.domain, PORT=5<instance_number>01 - Save the changes and restart J2EE engine
- After you restart the system, if you try to connect through the port without SSL, you will be redirected through the port with SSL
Now your Java system is more secure against internal and external attacks. Onapsis committed to providing the best recommendations and solutions for how our customers configure their SAP systems to help keep them protected. Additionally, the Onapsis Platform provides a module to check if your Java system has SSL enabled and if it’s possible to connect without SSL.
Do not hesitate to contact us for more information on how Onapsis can secure your business-critical applications.
For more information about the latest business-critical application security issues and our continuous efforts to share knowledge with the security community, subscribe to our monthly Defender’s Digest Newsletter.
Frequently Asked Questions (FAQs)
Is enabling SSL enough to secure my SAP Java system?
No. Simply enabling SSL/TLS only opens the secure port (e.g., 50001). The insecure HTTP port (e.g., 50000) remains open and accessible. To fully secure the system, you must configure the icm/HTTP/redirect_<x> parameter to force all incoming HTTP traffic to redirect to the HTTPS protocol, effectively closing the insecure entry point.
Why is SAP SSL port 50001 not active?
If port 50001 (or 5<Instance>01) is not active, it typically indicates a configuration error in the Instance Profile or the Key Storage.
- Check Parameters: Ensure
icm/server_port_xxis set toPROT=HTTPS. - Verify Instance: Port 50001 corresponds to Instance
00. If your instance is01, the port will be 50101. - Check Certificates: Ensure the
ICM_SSL_<instance_id>view in NWA contains a valid key pair. If the certificate is missing or expired, the SSL port may fail to bind.
How do I redirect HTTP to HTTPS in SAP Java?
To redirect traffic, log in via SSH and edit the instance profile (/usr/sap/<SID>/SYS/profile). Add the parameter: icm/HTTP/redirect_<x> = PREFIX=/, FROM=*, FROMPROT=http, PROT=https, HOST=sap_host.domain, PORT=5<instance_number>01. Restart the J2EE engine to apply the changes.
Where do I manage SSL certificates in SAP NetWeaver Java?
Certificates are managed via the SAP NetWeaver Administrator (NWA). Navigate to Configuration → Certificates and Keys. The specific view for the SSL port is named ICM_SSL_<instance_id>. From here, you can delete default testing certificates, generate new CSR requests, and import signed certificates from your Certificate Authority (CA).
